Building a Personal Website
A personal website is the single best place to collect your projects, papers, code, and CV in one link you control. For students, it is a low-cost portfolio that makes you findable and signals that you take your work seriously.
Why Bother?#
- Portfolio: show real analyses, notebooks, and visualizations, not just a list of skills.
- Projects and papers: host or link your research, blog posts, and course work.
- Ownership: a personal domain is a stable home you keep across jobs and institutions.
Options for Building One#
You do not need to hand-write HTML. These tools turn Markdown/R Markdown into a polished static site:
- Quarto websites the current, language-agnostic standard (works with R, Python, Julia).
blogdownan R package that builds Hugo-powered blogs from R Markdown.distillan R package aimed at scientific and technical writing.
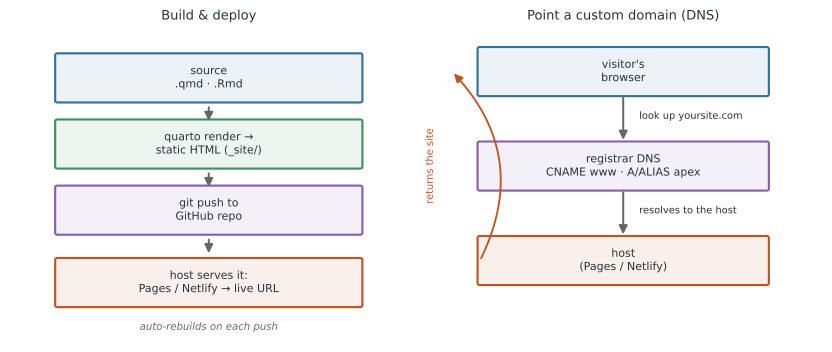
All of them produce static HTML (plain files, no server logic) that you can host for free (Figure 1).
Where to Host#
- GitHub Pages free hosting straight from a GitHub repo.
- Netlify free hosting with automatic rebuilds when you push to Git.
The Basic Steps#
- Create the site scaffold a project with your tool of choice.
- Build to static HTML render the source into a folder of HTML/CSS/JS.
- Push to a repo commit the project (and often the built output) to GitHub.
- Enable Pages or connect Netlify point the host at your repo and it goes live.
Minimal Quarto Website#
Create and preview a site from the terminal:
quarto create-project mysite --type website
cd mysite
quarto preview          # live local preview at http://localhost:port
quarto render           # build static HTML into the _site/ folder
The project is configured by a single _quarto.yml file:
project:
  type: website
  output-dir: docs        # GitHub Pages can serve from the docs/ folder

website:
  title: "Jane Researcher"
  navbar:
    left:
      - href: index.qmd
        text: Home
      - href: projects.qmd
        text: Projects
      - href: cv.qmd
        text: CV

format:
  html:
    theme: cosmo
    toc: true
Setting output-dir: docs lets you push the built site and tell GitHub Pages to serve from the docs/ folder of your main branch, no extra tooling required.
Deploying to GitHub Pages#
git init
git add .
git commit -m "Initial website"
git remote add origin https://github.com/username/username.github.io.git
git push -u origin main
Then, in the repository’s Settings → Pages, choose the branch and folder (e.g., main / docs) to publish.
Your site appears at https://username.github.io.
Buying and Pointing a Domain#
A custom domain (like janeresearcher.com) looks professional and is yours to keep.
- Buy the domain from a registrar (Namecheap, Cloudflare, Google Domains, etc.).
- Point it at your host using DNS records at the registrar:
- Add a CNAME record so
wwwpoints to your host (e.g.,username.github.iofor GitHub Pages, or your Netlify subdomain). - For the bare/apex domain, add the A records (GitHub Pages) or ALIAS/ANAME record (Netlify) the host documents.
- Add a CNAME record so
- Tell your host about the domain on GitHub Pages, set the custom domain in Settings → Pages (this writes a
CNAMEfile into your repo); on Netlify, add it under Domain settings. - Enable HTTPS both hosts issue a free certificate once DNS resolves.
Do let DNS propagate (it can take minutes to a day) before assuming something is broken. Don’t forget to renew the domain, letting it lapse takes your site offline.