Principles of Data Visualization
A chart is an argument made with ink, and the reader believes it before they read a word of your caption. That power cuts both ways: the same numbers can be drawn to reveal a pattern or to manufacture one. This page is about drawing them so the picture is both easy to read and honest.
Match the chart to the question#
Pick the chart from what you are asking, not from habit or from what a spreadsheet offers by default. A distribution wants a histogram or density; a relationship wants a scatter; a trend over time wants a line; a comparison across groups wants points with intervals. If you cannot say in one sentence what the reader should take away, the chart is not ready. More on the chart-to-question mapping lives in Graphing Data.
The perceptual hierarchy#
People do not read every visual channel equally well. Cleveland and McGill ranked how accurately we judge the channels a chart can use, and the ordering is stable.
- Position along a common scale is read most accurately, then length.
- Angle and slope come next, which is why pie charts are hard to compare.
- Area is worse still, so bubble sizes mislead.
- Color hue is near the bottom for encoding a quantity.
The practical rule follows directly: encode the number you most want the reader to compare as a position or a length, and reserve color for grouping, not for magnitude.
Color for everyone#
Roughly one in twelve men has some form of color vision deficiency, so a chart that leans on red-versus-green fails a real slice of your audience. Two habits fix most problems.
- Use a colorblind-safe palette: viridis for continuous scales, Okabe-Ito for categories.
- Never use the default rainbow (jet) colormap, which invents false boundaries where the data is smooth and hides real ones.
Do not let color carry meaning alone. Pair it with a redundant channel — position, shape, or a direct label — so the chart survives grayscale printing and color blindness both.
Avoid distortion#
Small choices in the axes and decoration can change the story without changing the data.
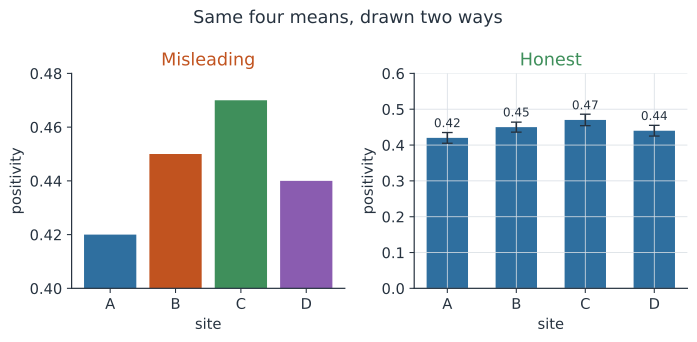
- Do not truncate the axis on a bar chart; bars encode length, so a y-axis that starts above zero exaggerates every difference, as the left panel above shows.
- Avoid dual y-axes, which let you slide two series until they appear correlated when they are not.
- Cut chartjunk: 3-D effects, heavy gridlines, and background images add ink without information and often mislead.
Show uncertainty#
A point estimate with no interval invites the reader to over-read noise. Show the spread — a confidence or credible interval, an error bar, or the raw points behind a mean — so the eye can tell a real gap from sampling scatter. The honest panel in the figure adds standard-error bars, and the near-equal sites stop looking different.
Small multiples and direct labels#
When you compare many groups, many small panels sharing one scale beat one crowded chart; Tufte called these small multiples. And where a legend forces the reader to bounce between a color key and the lines, put the label next to the line instead. Direct labeling keeps the reader’s eye on the data.
A worked example#
Suppose you measure test positivity at four field sites and want to show whether they differ. A first draft draws four colored bars on a y-axis running from 0.40 to 0.48, and the bars look wildly unequal. The redesign makes three decisions.
- Start the axis at zero so bar length is proportional to the value; the sites now look as similar as they are.
- Drop the per-bar rainbow for one color, since the site is already encoded by position on the x-axis.
- Add standard-error bars, which show the differences are within noise.
The numbers a good chart would show are exactly the group means and their standard errors, computed below.
In code#
Compute the summary the chart should display before you draw anything.
Python#
import numpy as np
import polars as pl

rng = np.random.default_rng(1834)
sites = ["A", "B", "C", "D"]
base = {"A": 0.42, "B": 0.45, "C": 0.47, "D": 0.44}

rows = []
for s in sites:
    draws = rng.binomial(1, base[s], size=60)
    rows += [{"site": s, "positive": int(v)} for v in draws]

df = pl.DataFrame(rows)
summary = (
    df.group_by("site")
    .agg(
        n=pl.len(),
        mean=pl.col("positive").mean(),
        se=(pl.col("positive").std() / pl.len().sqrt()),
    )
    .sort("site")
    .with_columns(pl.col("mean", "se").round(3))
)
print(summary)
shape: (4, 4)
┌──────┬─────┬───────┬───────┐
│ site ┆ n   ┆ mean  ┆ se    │
│ ---  ┆ --- ┆ ---   ┆ ---   │
│ str  ┆ u32 ┆ f64   ┆ f64   │
╞══════╪═════╪═══════╪═══════╡
│ A    ┆ 60  ┆ 0.45  ┆ 0.065 │
│ B    ┆ 60  ┆ 0.467 ┆ 0.065 │
│ C    ┆ 60  ┆ 0.5   ┆ 0.065 │
│ D    ┆ 60  ┆ 0.383 ┆ 0.063 │
└──────┴─────┴───────┴───────┘
R#
library(data.table)
set.seed(1834)
base <- c(A = 0.42, B = 0.45, C = 0.47, D = 0.44)
dt <- rbindlist(lapply(names(base), function(s) {
  data.table(site = s, positive = rbinom(60, 1, base[[s]]))
}))
dt[, .(n = .N,
       mean = mean(positive),
       se = sd(positive) / sqrt(.N)), by = site]
Why it matters#
Field data on positivity, incidence, or dose response usually differs by small amounts against a noisy background, which is precisely the regime where a truncated axis or a rainbow palette can invent a finding. Drawing the intervals and starting bars at zero is not decoration; it is the difference between reporting a signal and reporting an artifact. A chart that respects the perceptual hierarchy lets a collaborator or reviewer reach the right conclusion in a glance.